
WordPress & WooCommerce
Installation Guide
Complete technical guide for installing and configuring SendPol for WordPress and WooCommerce. Integrate your webshop with the Peppol network in a few steps.
Watch How to Setup SendPol for WordPress/WooCommerce
Learn how to install and configure the SendPol plugin for WordPress/WooCommerce in just a few minutes.
Table of Contents
What is SendPol?
SendPol for WooCommerce is a WordPress plugin that automatically integrates your WooCommerce store with the Peppol network. It transforms your order processing by automatically converting completed orders into UBL (Universal Business Language) invoices and sending them via Peppol without manual intervention.
Key Features
- Complete WooCommerce integration: Automatically recognize and convert orders to invoices
- UBL (Universal Business Language) invoices: Compatible with governments and business customers
- Automatic sending via Peppol: Standardized & legally valid
- B2B ready: Perfect for businesses selling to other companies or government entities
- EU compliance: Ready for Peppol e-invoicing requirements (mandatory from 2026 in many EU countries)
Why Choose SendPol?
From 2026, Peppol e-invoicing will become mandatory in more and more European countries, especially for businesses and government contracts. With SendPol, you're ready for compliance without complex setups or high development costs.
Start in test mode
By default, every new webshop is in test mode. Documents are validated and visible in your SendPol dashboard, but they are not forwarded to the Peppol network. This lets you safely test your workflow before any invoice goes live.
When you are ready for production, switch off test mode in your webshop settings under MyAccount.
Go to my webshopsInstallation
Prerequisites
- WordPress 5.9 or higher
- WooCommerce plugin installed and activated
- PHP 7.4 or higher
- SendPol account (register at www.sendpol.com)
Method 1: Installation via WordPress Plugin Store (Recommended)
The SendPol plugin is available in the official WordPress plugin store
Go to your WordPress admin dashboard
Navigate to Plugins > Add New
Search for 'SendPol for WooCommerce'
Click 'Install Now' on the SendPol plugin
Click 'Activate' after installation
You should see 'SendPol' in your WordPress admin menu
Method 2: Manual Installation
Alternative: Upload the plugin file manually
Download the SendPol for WooCommerce plugin
Go to your WordPress admin dashboard
Navigate to Plugins > Add New > Upload Plugin
Select the plugin ZIP file and click 'Install Now'
Click 'Activate Plugin' after installation
You should see 'SendPol' in your WordPress admin menu
Initial Setup
Getting Your API Credentials
Register with SendPol
Visit www.sendpol.com and create an account or log in to your existing account.
Find Your API Key in the SendPol Dashboard
API Base URL: https://api.sendpol.com
To find your API Key:
- Go to www.sendpol.com and log in with your account
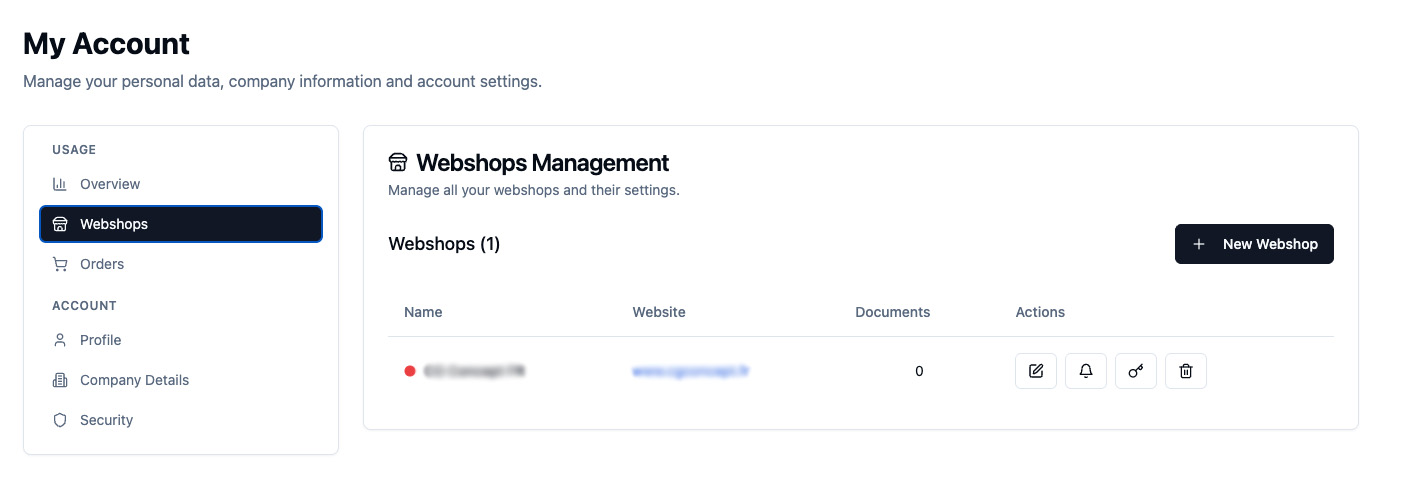
- On the left side of the dashboard, select "Webshops"
- Click on the key icon (🔑) to view your API key
- Copy this key and keep it safe
First-Time Configuration
When you first access the plugin, you'll see an onboarding screen
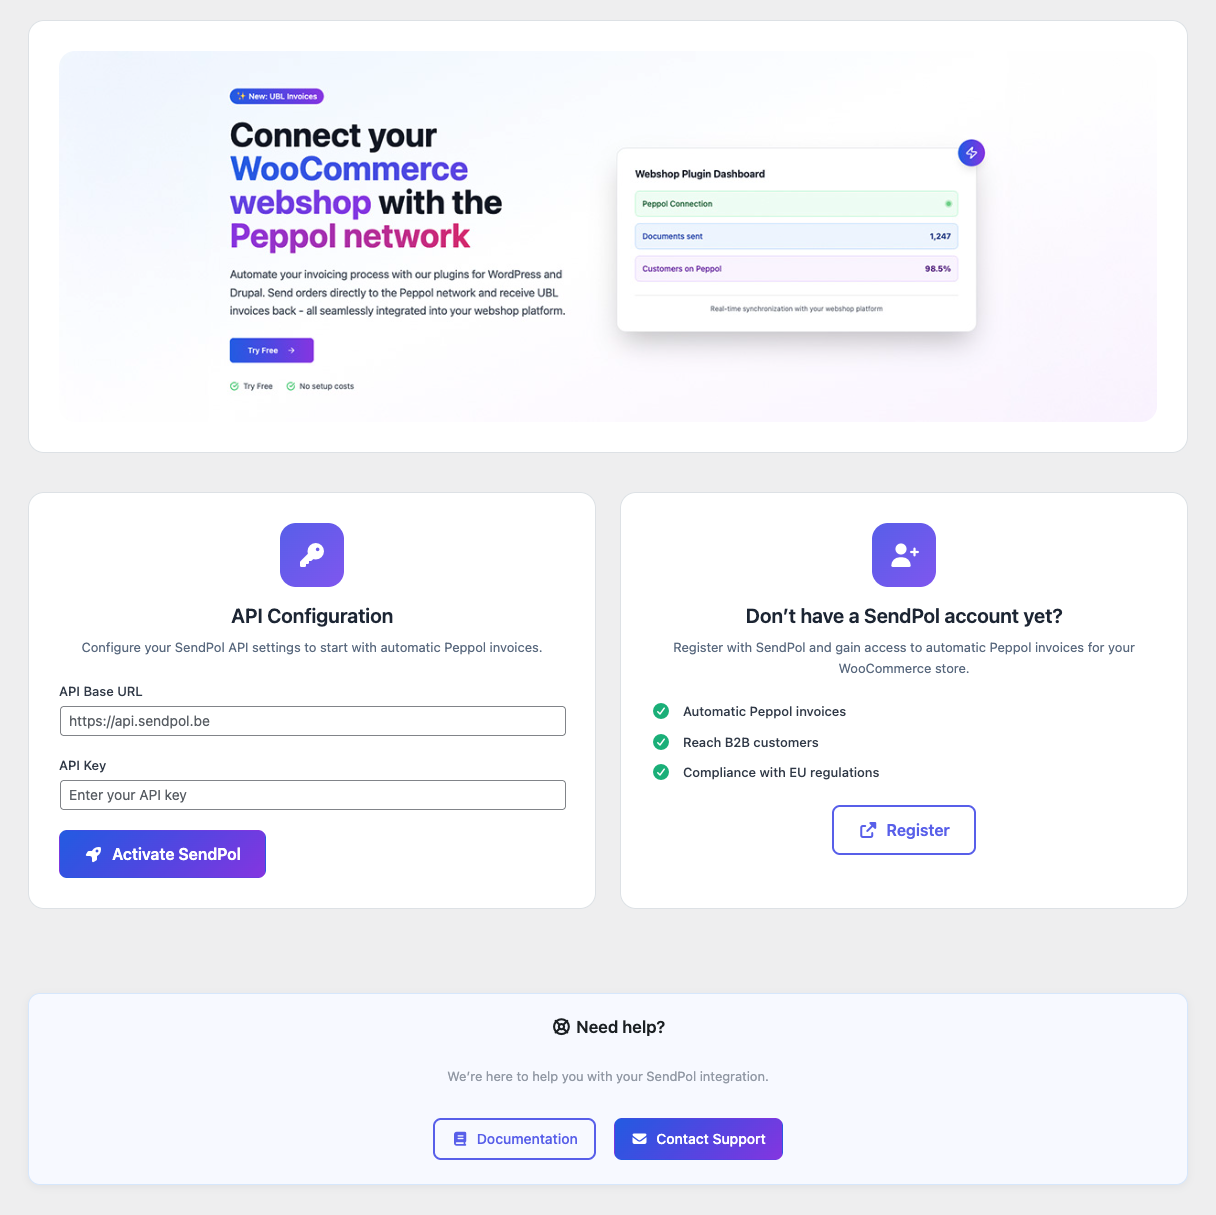
Click on "SendPol" in your WordPress admin menu
Enter the API Base URL: https://api.sendpol.com
Enter your SendPol API key
Click "Activate SendPol" - the plugin will automatically test your connection
Configuration
Using the Plugin
Automatic Invoice Processing
Once configured, the plugin works automatically
Order Completion
When a WooCommerce order is marked as "Completed" or "Processing", the plugin automatically generates a UBL invoice and sends it via Peppol to the customer.
Order Validation
The plugin validates orders before sending, checks for required customer information, verifies VAT numbers if provided, and ensures all necessary data is present.
Status Tracking
Monitor invoice status in the SendPol dashboard, view delivery confirmations, and track any processing errors.
Manual Actions
Resending Invoices
- From Order Edit Page: Go to WooCommerce > Orders, edit the specific order, look for the "SendPol - Order Status" metabox and click "Resend".
- From SendPol Dashboard: Navigate to SendPol > Document Statuses, find the relevant document and use available actions to reprocess.
Bulk Actions
Process multiple orders at once: Go to WooCommerce > Orders, select multiple orders, choose SendPol bulk actions from the dropdown and apply the action.
Credit notes & refunds
SendPol fully supports both full and partial refunds via credit notes.
- Full and partial refunds both generate credit notes automatically.
- Credit notes are sent to the Peppol network just like invoices.
- Manual credit note sending is available via the order action menu ("SendPol: Send credit note").
- Per-refund tracking: each refund is tracked separately.
- Cancelled order credit notes can be automated (see the "Automatic credit note on cancellation" setting).
Automatic retry system
When an invoice fails to send, the plugin schedules automatic retries.
- The retry system uses exponential backoff (retries at increasing intervals).
- Maximum retry attempts are enforced.
- Retry status is visible per order in the SendPol order metabox.
- Old retry records are cleaned up automatically.
- Manual retry is always available from the order page.
Dashboard Overview
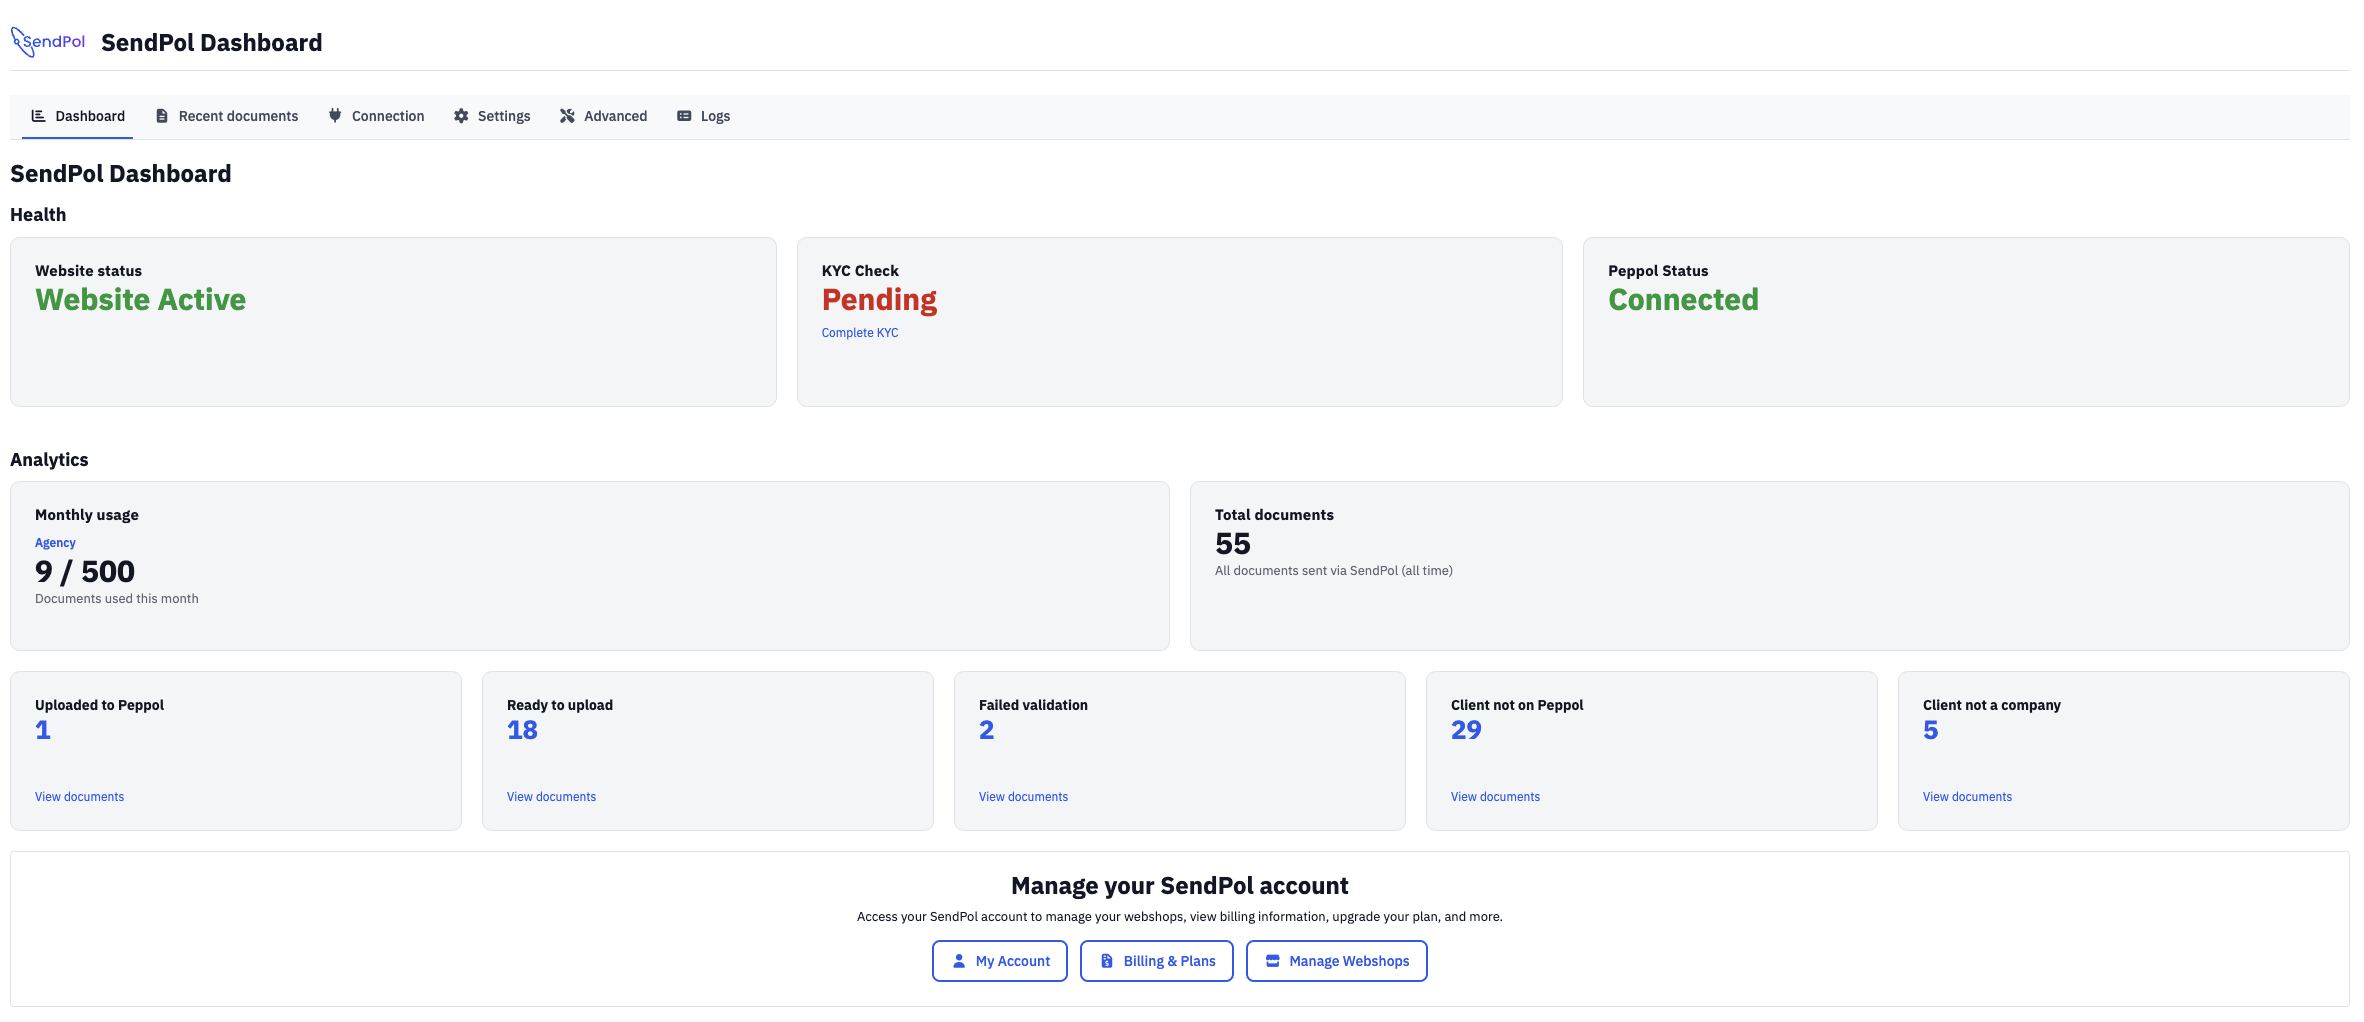
The SendPol dashboard provides a real-time overview of your Peppol integration with recent shipments, document statuses, connection status, and logs.
Statistics (Stats tab)
The dashboard stats tab shows:
- Documents sent this month and total (lifetime)
- Total API calls
- SendPol subscription tier and API usage limit
- Peppol connection status
- Documents uploaded to Peppol
- Documents ready for upload
- Documents failed: validation error
- Documents failed: recipient not on Peppol
- Documents failed: recipient is not a company
Recent Documents tab
- In the Recent Documents tab you can filter by status, document type, document number, and date range.
- Per document: document number, type (invoice / credit note), customer name, total amount, created date, and a status badge.
- Actions per document: Send to SendPol, Send via Peppol, Retry and Reset — plus Upgrade plan / Complete KYC when a document is blocked.
- Download UBL/XML button per document.
Order management
SendPol column in the orders list
The WooCommerce orders list has an extra "SendPol" column showing:
- Color-coded status badge
- Remote document ID
- A quick visual overview without opening individual orders
- Works with both classic orders and HPOS (High-Performance Order Storage).
Order metabox "SendPol – Order Status"
On the order edit page, the "SendPol – Order Status" metabox shows:
- Current status with badge
- Remote document ID
- Last sync timestamp
- Last attempt timestamp
- Validation errors (if any)
- Manual VAT number entry (a VAT number can be added or edited directly on the order)
- Action buttons: Resend, Delete and Resend, Send credit note, Refresh status, Debug payload
Bulk actions
Two bulk actions are available in the orders list:
- SendPol: Resend — resend the selected orders to SendPol.
- SendPol: Delete and Resend — delete the existing remote document first, then resend (useful when a document is stuck).
Debug payload
From the order metabox, the "Debug payload" button shows the full JSON payload that would be sent to the SendPol API. Useful for troubleshooting invoice content issues.
Compatibility
WooCommerce Blocks support
The VAT number field works in both the classic WooCommerce checkout and the new WooCommerce Blocks checkout. No additional configuration needed.
HPOS support
The plugin fully supports WooCommerce High-Performance Order Storage (HPOS). All features (order column, metabox, bulk actions) work with HPOS enabled.
Developers & filters
For developers, the plugin exposes admin tools and PHP filters.
VAT detection test
In the advanced settings there is a tool to test VAT detection on a specific order ID. It shows which meta key was used to find the VAT number, all VAT-related meta keys present on the order, and whether a VAT number was detected.
PHP filters
The plugin exposes the following filters, among others:
sendpol_wc_api_base_url— override the API base URL programmatically.sendpol_wc_external_invoice— provide a custom external UBL invoice for an order (return a UBL XML string, or null to let SendPol generate one).sendpol_wc_auto_refresh_order_status— disable auto-refresh of order status in the order edit metabox.sendpol_wc_show_api_base_url— hide the API base URL field in settings (e.g. for managed installs).
// Override the API base URL programmatically
add_filter('sendpol_wc_api_base_url', function ($url) {
    return 'https://staging.api.sendpol.com';
});

// Provide a custom external UBL invoice for an order
add_filter('sendpol_wc_external_invoice', function ($invoice, $order) {
    // Return a UBL XML string, or null to let SendPol generate one
    return null;
}, 10, 2);

// Disable auto-refresh of order status in the order edit metabox
add_filter('sendpol_wc_auto_refresh_order_status', '__return_false');

// Hide the API base URL field in settings (e.g. for managed installs)
add_filter('sendpol_wc_show_api_base_url', '__return_false');
Troubleshooting
FAQ
Plugin Screenshots
Configuration & Onboarding
Simple setup with API configuration and automatic connection to Peppol
Dashboard & Statistics
Real-time overview of your Peppol connection and sent documents
Quick Start
Get started quickly with SendPol for WordPress
Register with SendPol
Create an account at sendpol.com and get your API key
Install the Plugin
Download and activate the SendPol plugin in your WordPress dashboard
Configure API
Enter your API key and test the connection to the Peppol network
Need help?
Our support team is ready to help you with your SendPol integration